Friday, July 14, 2017

Seneca rocks, Franklin gorge and Earth Treks Crystal City

The month of June was a mixed bag of beans for me as far as climbing is concerned. I logged good training hours in the gym and has a good indoor bouldering spree. I bouldered more than I did routes, but did well to stick to the planned training schedule.


Then came the urge to climb outside and I responded. I went to my friends place and crashed for a week as he is just a couple of hours from Seneca. Boom! Out went training and regular sessions. I did climb at Earth Treks Crystal City and found that I onsighted much harder grades there (V7/5.12) than I do in my home gym. I also hand-dogged my way up a 5.13b (almost clip to clip). But I realized that none of the moves were really harder than a V6/7 on the route and with enough power endurance (PE) training I could readpoint routes of similar nature. That was an encouraging discovery.

While I float these grades around, I am perfectly aware that the Fish hook arete climb on Mt. Russell, which is less than a month away now, is going to kick my butt despite being classified as a moderate at 5.9. But hey, it's alpine you see! You know throwing around the word alpine here and there in a blog post makes it sound badass, doesn't it? Ok, coming back to the blog post now ...

Other thing about Earth Treks experience - fantastic route setting. The grades out there were consistent across heights and styles. My wife, who has major reach issues, still could stay strong and send routes that she could due to technique and strength without her reach being a barrier.

Other than climbing at Earth Treks, I plugged some gear at Seneca during this trip and also clipped some bolts at Franklin gorge. Seneca was encouraging, but an eye opener that overall body strength is so much more important on those multi-pitches than those single pitch crux-fest. I was probably tired from the 13-hour drive the previous day and less sleep. In any case, I could onsight a good 5.8 trad line, going off route and finishing some stout 5.10a moves on the adjacent route! It was heady and the blue Metolious #1 came in handy in the thin crack. Also, the slick limestone of Franklin taught me to persevere and focus more on mid-route rest and recovery before going for the chains.

However, the short time on the rocks (due to Fire at Seneca and rains) did not really help us with our outdoor mileage goals. Well, in any case it was a good experience to climb at Seneca and Franklin.

Thursday, June 8, 2017

Most important training principle: Simplicity

I followed a very typical climbing curve so far. That is, if I were one of the statistic from a sample population of climbers, I will live on the regression line and not be an outlier.

Like any typical climber, I progressed rapidly at first, then plateaued for a small time, then progressed with some harder climbing efforts, got injured, plateaued and stayed on the plateau for long. Then I started paying attention to my climbing methods, dabbling in some self-made training regimen, taking a critical view of my nutrition and rest periods. And again saw marginal improvements, which is still steadily increasing. All these phases have taken around 4 years, with 3 years climbing and a year of time off in between.

Like any climber who wants to improve, I have been reading a lot of training material, listening to podcasts, buying books and reading blogs. Here are a few important things that I have learnt.

  • Keep it simple and realistic
  • Showing up every single time and doing something is more important
  • Stick with a plan long enough for it to make some impact 
  • Listen to your body - pay close attention to nutrition, sleep and rest
  • Periodization & Progression works - Non-linear periodization is better than linear periodization
  • Whatever you do - For climbing, you always train three sport-specific things - Strength, Power, Power Endurance. These three are built on a solid basis of good basic fitness and general strength
Let's look at these things in a bit of detail.


Keep it simple - If it's complex you probably will not stick with it. Keep it simple and realistic. 

Show up - Consistency is they key. Immediate muscular adaptations that happen after a training session is short lived. For consistent and longer term adaptations, give any activity / exercise a minimum of 10-12 sessions over a period of 12-15 week cycles for it to be effective. Be regular, stick with it and give it some time to have an effect. 

Sleep well - After a heavy session, get at least 8-10 hours of sleep. Even on rest days, try and get in at least 8 hours of sleep. Most of the recovery and supercompensation happens in sleep, give yourself a best shot at it.

Have a balanced diet - Don't run away from good fats. Don't avoid carbs. For high intensity activity like climbing, carbs help you to fuel your sessions. Well, there have been fine example of Ketogenic diets doing wonders for some climbers, for eg. Dave McLeod. But it is a very strict and demanding diet and most people will fail at following it. A balanced 50/30/20 diet of carb/fat/protein will work well for most.

Rest - Rest for at atleast 24-48 hours between intense sessions including heavy weights, limit bouldering or strenuous power endurance sessions. Aim for a minimum of three days of climbing for strength, power and power endurance in a week. If possible, try and squeeze in a fourth day if your body permits. Climbing / training when tired and below par does more harm than good. I need to try and follow this more. However, it's important to note that maximal performance is not the goal of training. Training will result in a bit of fatigue and soreness. One must be able to differentiate between healthy soreness and unhealthy fatigue. When you feel the latter, stop, don't climb / train. In general, I take it easy (read half the regular volume every four weeks).

Training strength - Train general upper body strength by doing weighted pull ups and dips. No more than 5 reps at 85% of maximum capacity in a set for 3-4 sets. You can add dumbbell rows, I don't do it. For lower body, you can do squats only if absolutely required. I don't do it, except for when I am training specifically for a long alpine objective. I would also consider adding lock off strength training in my regimen. These are intense and short sessions that I would add after a redpoint session. In the rest periods between strength sessions, I do hanging leg raises as a part of my core strength routine. You can also add ab rollers or windshield wipers. In general, I like to do no more than 3/4 exercises in 30-45 minutes for general body strength sessions. 

Training finger strength - I like to do two fingerboard sessions - 1) Repeaters protocol including 7 sec on 3 secs off for 6 reps in a 1 minute. Do 2 sets each for 4/5 different hold/grips, and 2) Max weight protocol, which calls for 12 seconds hang followed by 3 minute rest for five sets each on two to three different holds/grips. Overall hangboard session lasts for around 50 minutes. I get a good session on Sunday, but accommodating a good fingerboard session after climbing is usually difficult for me on Wednesday. However, I try.

Training power - I am a big advocate of limit bouldering for training power. Go and bouder hard. Focus on hardest possible moves, not volume. Train for specific weaknesses, small crimps, dynamic moves and/or deadpoint moves. Can also incorporate campus board routines, but watch out for pesky injuries if you decide to do campusing. Instead dynos on big holds or maxi pull rungs is better.

Training power endurance - Route intervals mid intensity involves 4x4 (120/130 moves per set) on lead, while higher intensities involve 4x2 (60/70 moves per set) on lead. Do this once a week. I also add second power endurance session in the form of linked bouldering circuits, with 4x4x4 (50 moves per set) for high volume sessions and 4x4x2 (25 moves per set) for love volume high intensity circuits. 

In general, I like to incorporate a high level of specificity and keeping away boredom. Hence my preferred training volume is split in 30% of training (non-climbing time) and 70% climbing (climbing time).

This is what has been in effect for the past 4 months, with one months of injury-forced rest in between. Injury was not climbing centric and no way caused by the training. The training has helped me achieve my personal bests after nearly a couple of years plateau (read that is a few 5.12s and V7s).

Thursday, May 25, 2017

Putting it down matters as much as sending

I always loved to write, be it on sticky notes or the last page of your notebook, I always loved it. Then I started blogging. Initially, I wrote about things, things that affected me, inspired me, disheartened me -- all that was external to me. Then I started about myself, my thoughts, my process, my failures and accomplishments. I enjoyed this subtle transitions in my writing. This was well before I started to climb.

Then climbing came to me in 2013. Well, it came earlier than that, but I really never climbed in a focussed and committed way till 2013. Like every new climber, the quick initial progression from V1 to V4 made me feel great. I blogged about grades and climbing process and the routes I sent. The suddenly the strange feeling of 'tooting your own horns' came to me that said stop blogging/bragging about your accomplishments.

I don't know why it came or what triggered that feeling, but it came for sure and hit me hard. I deleted a lot of my old climbing posts and the subsequent posts that I wrote gave more of an objective description of my outings, climbs. Everything was mostly from a third person point of view. It started sounding more like a report rather than an experience. An objective viewpoint, rather than my own subjective one. And then I wondered why the process of writing was no longer fun. I lost faith in the process of writing. And eventually stopped writing about my climbs. I merely posted a few photos, but that did not help me relive the experience or process.

Anyway, climbing always remained close, but had to take a year off in 2015/16 to manage professional commitments. Even then I tried to train whenever I could. It was an honest, but poor effort. Then, things changed and I had access to climbing once again.

In March this year, it was 6 months that I had come back to climbing (Since October 2016) and I was starting to immerse myself in climbing again, with more zeal if anything. The break was surely good. In these 6 months, I took my first lead fall on gear (trad climb), I onsighted my first 5.9 trad.  I was charting down my training regimen and my schedules. It was fun and inspiring. Although I realize now that the training plan is an ever evolving sheet and I have to modify it as I grow. But the point is that getting back for surely great.

Then I had my first major finger injury where I crushed my pinky under a loaded barbell and could literally see my tendon sheath severed. The extensor tendon was hurt bad. I learnt the process of being patient and recovering. Eating well. I still visited the gym to remain stoked. I learn restraint and not climbing on my injured finger. I ran a lot and did some core exercises, but nothing that even remotely required my hands. My return to climbing lasted 4 months before I had to stop climbing for a couple of months due to finger injury.

But like everything else, the injury phase passed and I started climbing again. It's been four weeks now. I am training religiously. I haven't had the chance to go out, but indoors I sent my first V7 and am very close almost sending my first 5.12b (7b) route.

Well, I know many will say its plastic, but, that's where the prologue of this post comes into play. I should start being subjective about my sport, about my passions and my skills and my accomplishments. I should believe in them and describe the process. Because when describing the process, I am not just putting down what I managed to do, but I also rethink and relive the process. It's helps me understand the subtleties of the process and helps me appreciate the finer moments.

And above everything else, it teaches me a lot about myself. And I believe that it may teach or at least inspire someone else to apply it to their own processes. The send on any route, lasts for 4/5 minutes. Considering that average route is around 40-50 moves long, with a couple of rest stances where you can shake out for 20/30 seconds and at an average rate of around 5-6 second per move -- all totaling to around 250 seconds. Yeah, so besides the math, the average redpoint send lasts for 4/5 minutes, but the process lasts much longer if you are conscious.

Consciousness is the key here. The process can be reduced to mere neuromuscular coordination without any conscious learning if you focus on mechanical movements and sequences. But if you are conscious the very process can be a rich and rewarding experience where you know the exact angle of your heel hook and at what moment to engage your core and when to breathe.

I am beginning to learn this and enjoy this. I want to be a good climber, a better one. To the level of what? Well, I wouldn't mind 5.15s and V12s. But for now, I lay my aims on being able to redpoint 5.13 grades in sport. Which means, I need to be solid at V8 (and be able to pull off V9 after some work) and pretty comfortable with 5.12s in sport. When I say solid, I mean I should be able to do it in a few tries, almost on all styles. Which would directly translate to being competent 5.11 trad leader (including cracks, at which I currently suck) and being able to send mega classics like Casual Route or Beckey Chouinard without any epics.

I am taking a big leap and putting it down. Because I need to be more subjective about it and be conscious about it to be able to ingrain that  process in my routine -- training, sleeping, diet and the actual climbing sessions. I truly believe that writing helps and putting in down on paper or blog or anything will help me realize it. It matters as much as sending.

Monday, March 27, 2017

Serendipitous climbing experience at T-Wall

I am an aspiring trad climber for long now. I do not get to do a lot of real rock climbing being in Florida; and hence trad climbing as a discipline, which is honed after a lot of vertical mileage, has always been an elusive skill for a guy like me used to plastic pumping indoors. I should say that this is even more true in the niche of crack climbing.

Cake Walk 5.10a


I have done a few 5.8 trad climbs at Lost Wall, where I could avoid the crack and use features on the face. I have done a couple of long alpine routes in the High Sierras, which were more of ridge climbs rather than 'real cracks'. I had never yet attempted a 5.9 trad climb, leave alone crack climbs. And unless I really did a few decent cracks, calling myself a trad climber seemed a far fetched epithet.

Well, this trip to T-Wall changed it a bit, except for the fact that I still don't hesitate to consider myself a gumbie, or a beginner at the best in terms of crack climbing. I simply need to have more mileage on dihedrals and splitters before I can consider myself a competent crack climber.

Coming back to the T-Wall trip, I was happy to onsight a couple of stiff classics and even attempt a 5.10a finger crack.


Nappy 5.7

Golden Locks 5.9

Golden Locks 5.9


Besides Nappy (a good consistent dihedral crack at 5.7) and Blind Date (an ok 5.7 crack) as warm up climbs, I managed to onsight some higher grades on Razor Worm (5.8+) and Golden Locks (5.9). Razor worm came to me easy, but Golden Locks was really stiff and the fact that I could onsight it, no matter the Elvis legs, really helped my confidence.

I also went out of my comfort zone to lead Cake Walk,  a 5.10a finger crack, albeit with a couple of falls at the crux and near the chains. This was also the first time I took a fall on gear and that too on a #0 Metolius TCU that I managed to sink and clip seconds before my foot popped at the crux. It was a small fall, would have been more like a take if it were not for unanticipated foot slip. In any case, I am glad that it did not freak me out!

Tuesday, February 14, 2017

My training regimen for alpine climbing - Part 1

I have always been an active outdoor person since I was a child. Besides active sports, I have been an avid hiker and have logged many miles with relatively heavy backpacks (30+ pounds) through all these years, irrespective of my body weights.

Please understand that carrying inordinate amount of weight on your backpack (more than 20% of your body weight) over an extended period of time isn't always the best thing to do. I realized it the hard way with a bothersome knee in my twenties, however, all was not lost and I could recover and repair the damage done by taking necessary corrective measures.

Anyway, so the purpose of this background information is to establish the fact that I have always had a solid aerobic base for long hours of moderate intensity hikes. However, those ascents were not fast by any means. But, those hours definitely helped me have a solid foundation for what it takes to do bigger peaks in light and fast manner, or at least pave the way for it.

I have never been someone who believed in systematic training and always lived by train by climbing and hiking, rather than spending those long hours in the gym or on a treadmill. However, in 2014 I came across this book, Training for the new Alpinism by Steve House and Scott Johnston and it completely changed my perspective towards systematic and meticulous training. The fact that I was going to be a part of a ~6000m peak on a Himalayan expedition also helped me to stay motivated and train in a disciplined manner.

I also did my basic mountaineering course in Manali, which involved spending 4-weeks in the mountains at altitudes of between 7,000 to 15,000 feet, including daily drills of rigorous physical training, exercises and basic rock and snow climbing. While not on the cutting edge of the technical spectrum, the simple act of performing physical activity day in and day out for 6+ hours every day on an average for four weeks straight really upped my mountain fitness.

This was on the back of nearly 6 months of strict adherence of the plan that Steve and Scott have recommended in their book. The combined effect of these two was nothing unexpected. I was in the best shape and more than able to easily summit the 5980m peak (19,600 feet approximately) with a lot of gas still left in the tank. I was well acclimatized and in good shape.

Now, back to the flat lands, I do not have the luxury of spending any amount of time in the mountains. But, I can still follow the training regimen in the book and over the last 3 years of trial and error I have now constructed a plan for me and my partner, who also happens to be my wife.

This plan is not purely for mountaineering training, but rather a mix of alpine training + rock climbing training and also includes some time on fingerboard. At the time of writing this, I can onsight up to 5.10d/.11a sport routes on rock (redpoint up to .12a) and 5.9 on traditional climbs. My wife has an onsight sport climbing grade of around 5.10a/b (redpoint up to .11b). Bouldering wise, I am at V4/5 onsight grade (sends up to V7) and she is at V3/4 (send up to V6). This is to establish that we are decent climbers (read intermediate with relatively decent aerobic base). We also have completed a few Grade III and IV routes in the High Sierras without much difficulties.

Now, three years after my Himalayan expedition, it's been a long gap and months of systematic training has been few and far, due to family, work and other issues that an immigrant faces in the United States. Given this situation now, I was not sure about my aerobic base. However, do note that we get to do a lot of gym climbing, but being in the flat lands of Florida, not much leg work.

Hence, I tried a few of the Alpine combine tests prescribed in the book, especially focusing on the elevation gain part. I was pleasantly surprised to find that I could do 3038 feet (926 m) of elevation gain within 1 hour at body weight and 1000 feet elevation gain with 25 lbs backpack in 21 minutes. I did both these test not in my mountaineering both though, both these cases were done in my regular running shoes. However, the timings on both these test underscored the fact that aerobic base definitely has a solid foundation and the legs definitely are in decent shape - not great factoring in that I used my running shoes, and did not factor in altitude, uneven terrain, cold and wind resistance - to support my aerobic fitness. However, even as I trudged along, I felt that it is my legs that are probably the weak link as compared to my cardio base. For my wife, who managed 2800 feet in 1 hour at body weight, it was the other way round.

For the weighted 1000 feet test, I used the box step method, while for the 3038 feet ascent at body weight, I used a grade 15 incline on treadmill and cover 3.9 miles in an hour. I do understand that training at sea-levels in Florida is nothing like the real-world mountain terrain and conditions out there, but having experienced that as well, I feel that we are doing above average for a pair of Floridian with full-time jobs and limited access to mountains. I believe, this understanding and realistic evaluation of our abilities is important to understand the kind of training loads that one should impose on their bodies. Overtraining or undertraining will simply yield no benefits.

Given this base, we will be ramping up our training regimen with a more systematic approach to be better climber - fast technically proficient and with enough mental and physical reserves - to complete our alpine endeavors. I have taken a few liberties to modify and adapt our training schedules to train multiple parameters such as endurance, upper and lower body strength as well as muscular endurance in addition to finger strength workouts. The result is 18 hours per week of training schedule, with ~10 hours over the weekends and 8 over the weekdays after work.

It's not going to be easy and we will definitely miss some sessions due to fatigue, lack of recovery or other commitments, but overall the goal will be to stick to the plan and do no less than 15 hours of training every week. I guess, sticking to this volume will definitely yield the desired results and provide with adequate safety cushion to perform out there in the mountains.

In the next part, I will detail the activities that I use as a part of my training regimen, how much rest I prefer and can manage after each activity and the sequence in which I do these. Again, the next part detailing the individual activities of my regimen are built on the base information given in this post and cannot be viewed in isolation.

Wednesday, December 14, 2016

Outdoor activities in the year 2016

So, it's been a long time coming. Almost a year now since I wrote anything about my outdoor escapades. Well, I haven't had much in the first half of the year 2016, but the second half has been amazing.

After the Rudra climb however, I did one more traditional-style rock climb on the wall of Prabalgad. It was a virgin route over a vertical face of approx 200+ feet of crumbling rocks. The crack was shallow and difficult to protect in the upper sections. I stopped around 50 feet short of the summit due to extremely loose rocks and fading light. Had to cut a around 15 feet of rope to sling a chockstone and rap back to the highest anchor point before wrapping up the attempt.

The Prabalgad wall was my second virgin climb in 2 months. First one was a few weeks back near Tryamabeskhwar. That one was successfully completed without any bolts or aid moves. The Prabalgad climb was significantly more challenging than the other one on two accounts - the moves and poor rock quality.


On the penultimate pitch, I aided a 5.11a-ish move on a suspect placement, and then followed it up with a couple more aid moves to pull on to a ledge, both in the realms of .10d/11a.That was the one and only aid sequence I have done and on suspect placements. It was nerve-wracking and hence memorable. I am a free climber, and to do aid moves on suspect placements was a unnerving to say the least.

Anyway, after the Prabal climb I could not do much rock climbs. I did a couple of hikes but nothing much to talk about.

In July, I flew to US and then happened the Canada trip. We hikes more than 100 miles during our 2-week stay in Banff and Jasper National Parks. Beautiful is an understatement. And so is splendid. I'll let the pictures explain it - www.mowgliandpanda.com/banff

After the Canada trip I came back to Florida and just pumped plastic. I think I got stronger than I was earlier. Regaining of the lost endurance is still work in progress. All in all, the Edge Rock Gym in Jacksonville is a blessing in the otherwise flat lands of Florida. It helps me to keep climbing. Systematic training schedule is still being worked out and not yet kicked off completely. But the schedule is on and the start is just fine. Hope to continue and stick with the planned schedule. Availability of the gym and bouldering walls actually is a detriment to stick to hangboarding regimen, which was my only option back home when I was in India.

I hope to do an outdoor trip to Tennessee or North Carolina and climb some actual rocks, which I have not done since a month. Last I did was some climbs at Lost wall in Georgia, where I repeated a few traditional style routes up to 5.8/9.

Sunday, January 3, 2016

Rudra: A pinnacle climb in Nashik region

This post is about a beautiful climbing trip spanning the 3-day long holiday over the Christmas weekend from 24th Dec to 26th Dec 2015.

Please note: All photos included in this post are courtesy of Pramod Srinivasula, Kaivalya Varma and Komal Gupta.


Location / Base
Pahine village, near Tryambakeshwar.
Just as you look towards the huge Anjaneri massif towering over the Pahine village, you cannot miss to see this prominent pinnacle jutting out from the ridge that running west from the Anjaneri massif. This is the Rudra pinnacle. The name is much apt for this pinnacle, the one that presents an imposing and dominating presence in its surrounding landscape.

Water can be sourced from the village itself.

Approach
The approach from the Pahine village to the base of the pinnacle is a good 75 minute hike.

Day 1: Saturday
We had an all-night  drive from Mumbai to Pahine village on Thursday followed by a long and tiring recce hike and Pahine Navra pinnacle climb taking up much of our Friday. So an early start on Friday was highly unlikely. Likewise, we had a delayed start on Saturday We started at 9 from the campsite and by the time we started climbing, it was already 11.00 am.

The Rudra pinnacle is a 500+ feet of climb over four pitches along its western arete falling towards Pahine village.

Pitch one - 140 feet 
Base to intermediate unstable ledge

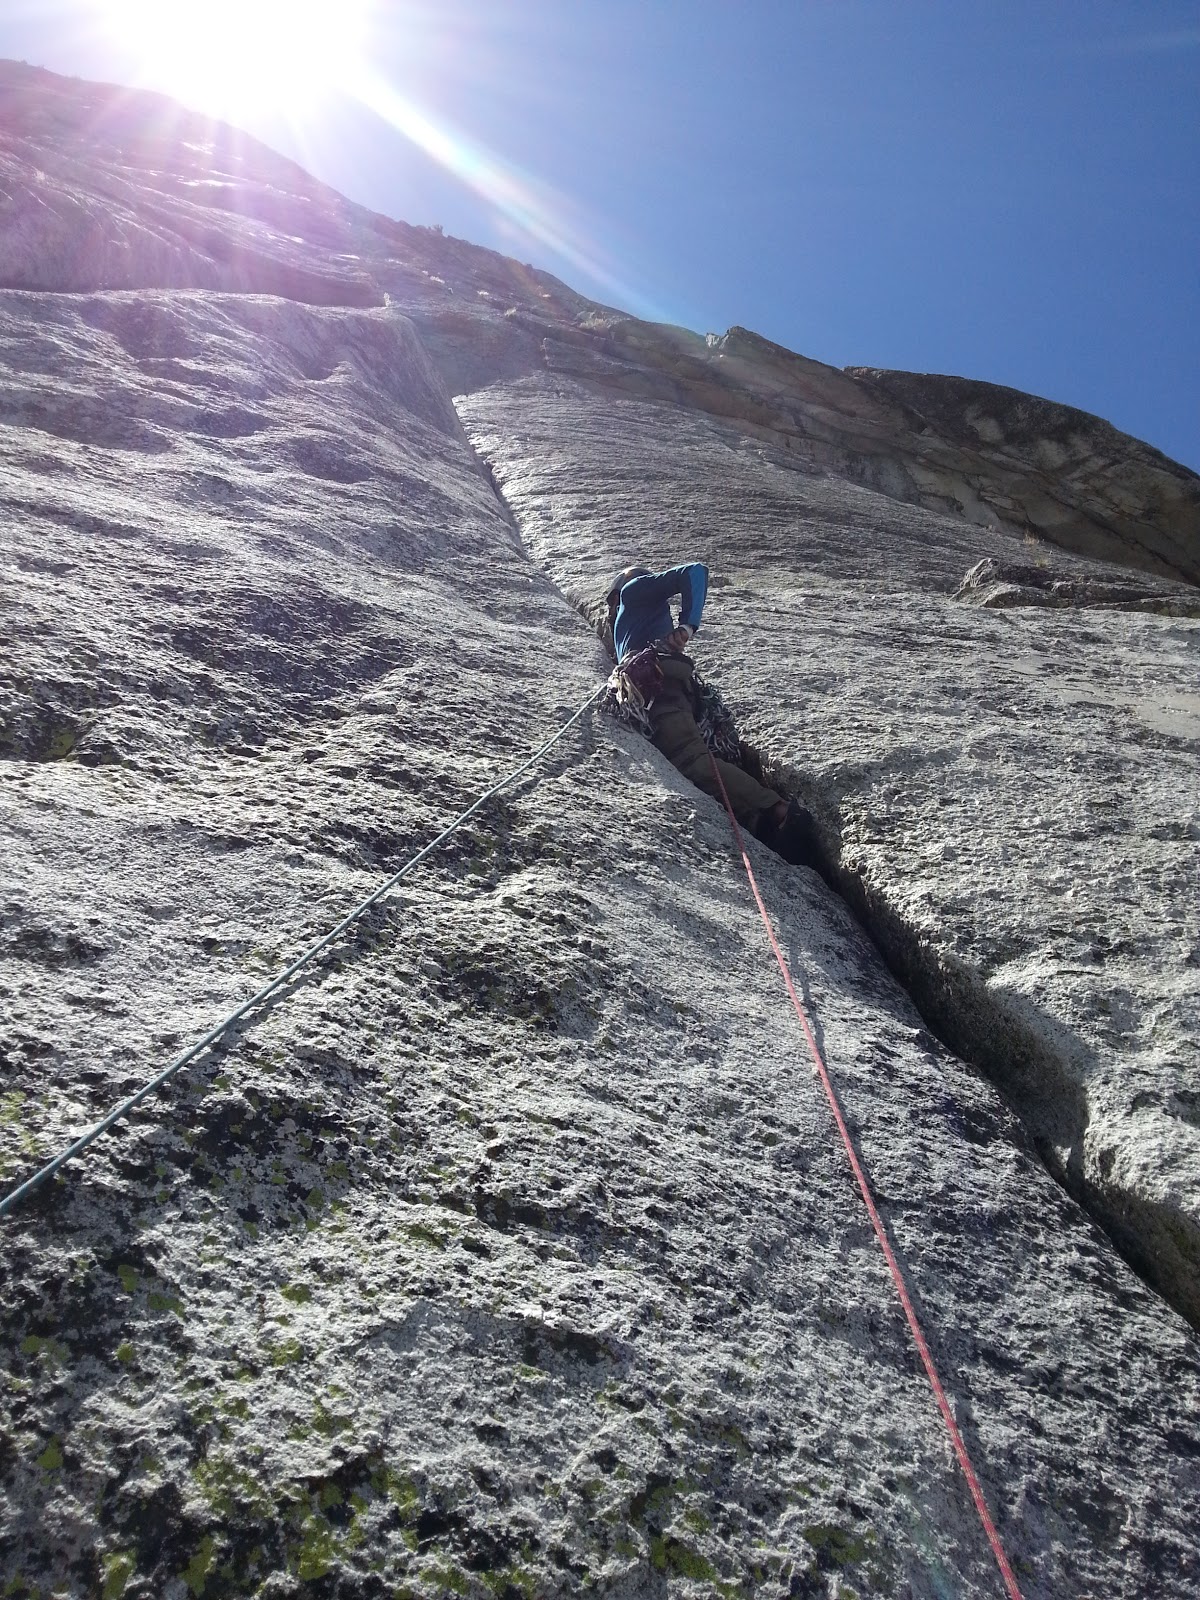
A gradual start of 15 feet - 3rd class scramble before the face steepens to vertical. Here, if you decide to go straight ahead you will have to do a  5.10 / 6a move over the bulge. There is no protection whatsoever and a fall would be a deal breaker. I followed a much safer way, which is to move to the right over an easier 5.7 / 5a terrain over some loose rocks and intermediate scree. The route is quite straight forward from here and goes through a distinct open book feature (obtuse dihedral corner). There is not much chance to protect anything till this open book, which nicely gobbles up BD #2 cams. Before the open book feature however, one can only find some poor micro cam placements that offers something, but nothing trustworthy.

Above this open book, you will see a distinct block forming a roof overhead. The second ledge is on top of this roof block. I byassed this roof section from its right and a quick scramble got me to the first ledge. When I reached the ledge, I was good 40 feet above my last protection. Besides, this entire ledge is a shaky and unstable affair. There is no gear placement to build an anchor on this ledge; only a cactus shrub which offers some screen to hammer in a peg. To add to this, the entire ledge vibrated while I was driving in the peg and that did got my stomach churning. I was very slow and cautious as I hammered in the peg. Most of this ledge is rocky and hence it was difficult to find a deep enough scree patch where I could hammer in the peg. I managed to somehow find one and build an anchor. Mahendra (second man) swiftly made his way up to this ledge. As soon as he got there, I got moving from this unstable ledge at the drop of a hat.

Note: I did not carry any pegs, pitons and hammer on this pitch. But after almost running out some serious distance feet over a suspect cam placement 25 feet below me. I stopped over a scree slope with no protection. I did not carry any tag line as well. So I had to pull some rope, make a coil and throw it below to get a couple of pegs. All this while being unprotected on a scree slope. That was a big mistake on my part, which ate up precious 30 minutes, besides adding some unnecessary risks. Lessons learnt: Never move in Sahyadri without a hammer and a peg (and still safer a bolt kit).

Pitch 2 - 80 feet
Unstable first ledge to big second ledge

The second pitch is a good easy climb with ample protection possibilities. This pitch gobbles up anything from Bd #.75 to #2 and the climb itself is straight forward and mellow. The rock is much firmer than the first pitch and the route follows  straight line till the cactus thickets overhead. The last couple of moves before pulling over the ledge are fun 5.7 moves, albeit over some scree.

Second ledge is a big ledge and can accommodate 50 people easily. There is a nice crack that runs vertically along the wall. This crack easts up #1, #2 and #3 BD cams easily and offers a bomber anchor - in much contrast to the first ledge. There is also an old peg (placed by the first ascent Bhramanti team back in 2011) that can be used for the wind up during the descent.
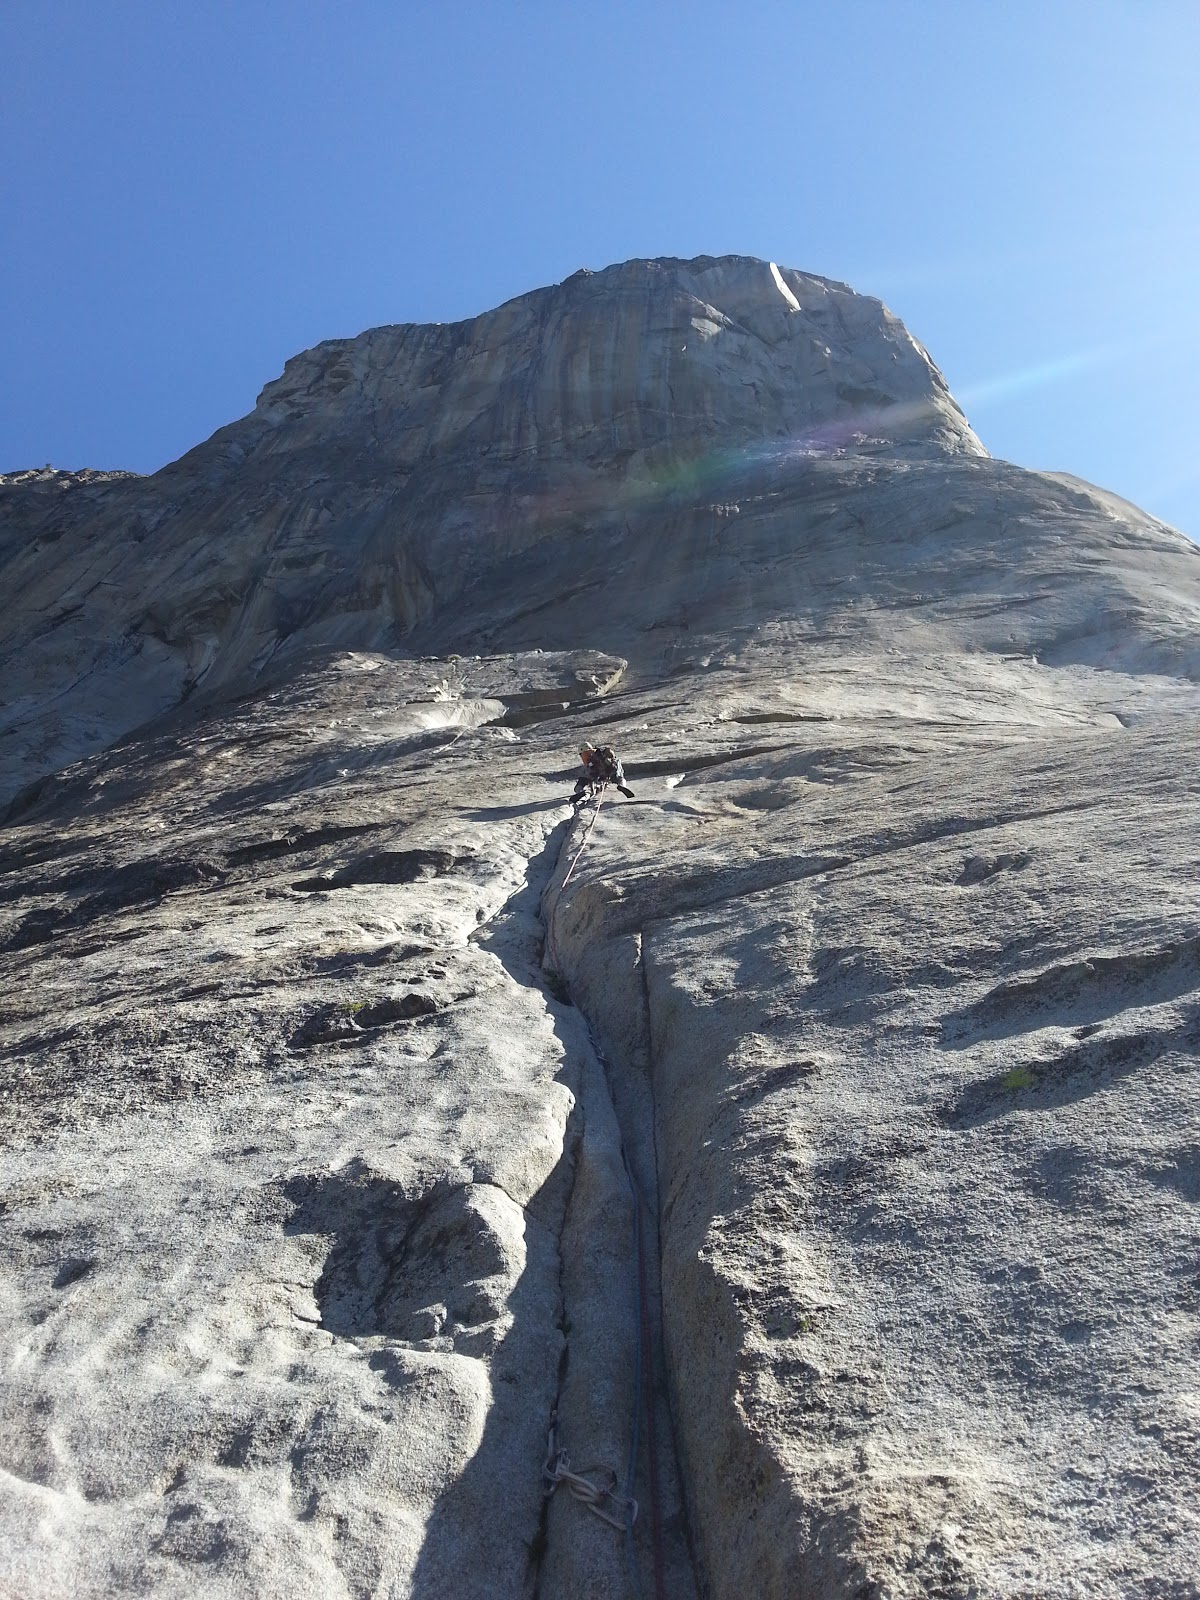
Pitch 3 - 80 feet
Big second ledge to the big third ledge via the traverse

This is the money pitch of the climb. Right off the second ledge, the vertical crack that I used for building the anchor runs straight up for 15 feet before merging on to a horizontal ramp. The route straight ahead is overhanging and devoid of any climbable holds. The route beyond this overhang is straight forward and in  straight line. There were two options to bypass this overhang from the ramp where I was standing. To my right I could see an open book feature, which looked climbable and tempting. It is indeed climbable, but completely unprotected with only a poor micro cam placement possible about 30 feet above the ledge. Other option is to bolt, which I will avoid at all costs on all the climbs unless absolutely required. So, not finding either of the two options palatable, unprotected stiff climbing or bolting, I left that option for the brave heart and took a winding route from the left.

The route form the left traverses for about 25 feet to the left over an easy class 4 but exposed terrain. Then again to the right till the traverse is blocked by a big bulging rock. I had to traverse over this bulging rock to join the straight route on the face beyond the overhang above me. This move to traverse over the bulge was the crux of the climb for me. A completely exposed and insecure move, especially after a 25/30 feet of traverse on blocky terrain. A fall here would have meant bang bang pendulum over the rocks! I placed as many cams as I could and then made a slightly lunging move to the right. The sound of a good slap as my hand hit the sweet spot on the rock brought a respite to that nerve wrecking move. In the hindsight to mellow it all down, I would rate it as no harder than a 5.9 move. But the exposure and uncertainty always adds  grade or two to the feel that is beyond the purview of the difficulty grades!

Beyond this, due to the serious rope drag owing to my numerous cam placements on the traverse, I set up a quick anchor to get Mahendra upto the belay station. Had I set lesser cams for the traverse below, the rope drag would have been more manageable to move on to the second ledge proper.  Once Mahendra made his way to the intermediate belay station, I quickly moved up to the second ledge roper, which was a straightforward climb of 30 feet above the traverse. Second ledge, similar to the first one is a big ledge with offering plenty f bomber gear anchors. I used a BD #.75 #2 and #3 to set up the anchor. Mahendra quickly followed up to the second ledge.

It was 4.45 pm by the time we reached second ledge. We had done 300 feet of good climbing today, with another 200 feet of scramble remaining above us to reach the summit. The remaining scramble was a matter of around 45 minutes. But, since the rest f the team anyway had to climb the pinnacle and we had one more day with us, we decided to wind up for the day and descend to the base camp, leaving the ropes fixed till the third ledge.

Back at the base camp it was a feast, and God knows we needed it badly. It was a long day of good 5 hours and 300 feet of climbing for the day.

Day 2: Sunday

The day was all about mostly fixed rope ascent till the third ledge - the highest point on the pinnacle that I could lead the earlier day. Mahendra jumared first, followed by me. We took around 1 hour to reach the third ledge. Simultaneously Prem and Komal had started to ascend the fixed ropes below us. While they ascended the fixed ropes, I started leading the fourth pitch beyond the third ledge.


Pitch four
Third ledge to final pyramid

The route from the third ledge winds to the left and over an easy, but loose 5th class. After a short section of around 50 feet, I came cross a long scree slope with gradual gradient. It was a scree walk in Karvi bushes, causing some serious  rope drag. As if 300 feet of jumaring earlier was not enough, the rest of whatever energy I had left in me was spent trying to pull myself through the rope drag. I nearly ran out the full 70 meter of the rope length before coming to the base of the final rock patch. I built a gear anchor here and Mahendra quickly followed. Although there was nothing dramatic about this pitch, one thing to note is that it is impossible to communicate with your belayer once you pull over to the scree slopes. To manage this problem, I prussiked my way back down for around 150 feet till the edge of the slope to communicate with Mahendra.

Anyway, once Mahendra was there, it took another 15 minutes to scramble over the remaining 75 feet of easy but loose sections to reach the summit.

The summit is a big one, offering magnificent views of the entire surrounding with an awe inspiring 360 view of the region.

Descent
The descent is by rapping off along the climb line. We left one peg near the summit for rapping off from the summit till the tree at the base of the final pyramid.If you have two 100 meter rope coils, you can rap off from the tree just below the final pyramid till the second ledge. From second ledge you can rap off using the peg left by the first ascent team in 2011. However, while rapping off, please be sure to check the condition of the tree and the pegs. We used them, but it may not be in the best condition down the line. Be safe an carry extra pegs for the descent.

I must note that Mahendra did the long wind up quite efficiently and quickly.

Quick stats
  • Route: 500+ feet of four pitch face/arete climbing with long winding sections and traverses.
    • First pitch goes at 5.7
    • Second pitch goes at 5.5
    • Third pitch goes at 5.9
    • Fourth pitch is mix of easy fifth class  mixed with some scree walks and scrambles
  • Best time to climb: November to Feb. SInce most of the route is over an exposed west facing arete, anytime after February will be too hot to climb.
  • Protection: Cams, nuts and pegs (no bolts and pitons)
    • Doubles of BD #.75 to #3 (For pitches two, three and four)
    • Single set of Metolius TCU #0 and #1 or BD X4 # 1 and #2 (For first pitch)
    • Single set of micro nuts BD #1, #2 and #3 
    • 4 pegs - For the anchor on first ledge and descent
    • 6 single length alpine quick draws, Four double length alpine quick draws
    • Two double length slings
    • Anchor building gear - Slings, locking biners, etc. etc. You know the drill!
  • A 60 meter rope will suffice to do it in 4 pitches. However, f you want to link the first two pitches to avoid the unstable first ledge, you'll need a 80m rope. A 70m will not make the cut for linking pitches.
  • 200 meters of static rope for winding up (300 meters if you are fixing up the line all the way to the summit)
  • Rock quality: Poor in the first pitch, good in second and third pitches, scree scrambles in fourth pitch
  • Time required: We did it in two days, but with an early start and small team, it can be done in one long day. 
  • Style: The entire route is climbed in a free and clean, no aid, no fixed pro and bolts.

Team
  • Kaivalya Varma
  • Mahendra Kubal
  • Santosh Nigade
  • Anil Jadhav
  • Komal Gupta
  • Pramod Srinivasula
  • Prem Khilari
  • Prajakta Korde
  • Rohan Rao
Summit party: Rohan, Mahendra, Prem and Komal.

A special and a big note of thanks to the awesome support team.  Kaivalya, being a member of the first ascent team back in 2011, knew the route like the back of his hands and provided valuable guidance all along.

Santosh Nigade and Anil Jadhav were the stars with all their selfless work to manage the campsite and kitchen duties. If it wasn't for their delicious cooking, the trip wouldn't have been so memorable!

Pramod for helping out with the load ferrying and helping out during the climb.

And my dear wife Prajakta for being always there.

Saturday, January 2, 2016

Konkan bike trip 2016

A 920+ kms ride through the rough and smooth of coastal Maharashtra.

This has been one of the most cherished road trip I have done along the coastal Maharashtra. Reasons for this are many, but first and foremost would be the fact that it was completely unplanned right from the moment when we set from my house and right through the trip until we decided to return back 4 days later. None of it was planned - the destinations, the route, the accommodation etc etc. This was truly as 'take it in your stride as it comes' road trip and the experience it offered has been really enjoyable to say the least.

Along our 920+ kms 4 day sojourn on the two wheels from Kalyan to Ratnagiri & back, we touched upon a lot of major tourist areas dotting the Konkan tourist map; stopping at some and waving on the go at some others!

The route we took looked something like this -

Kalyan - Mangaon - Diveagar - Mahad - Ratnagiri - Ganpatipule - Jaigad - Hedvi - Velneshwar - Guhagar - Anjanwel - Dabhol - Dapoli - Mahad - Pachad - Mahad - Kalyan

Now, I know a lot of it is winding and through some not so good roads, but that's what the entire trip was all about - unplanned melodies, with some of them not being so melodious ; -)

Sunset at Diveagar beach

Baskya buruj at Ratnafurga fort, Ratnagiri

Ratnadurga fort, Ratnagiri

Thiba palace, Ratnagiri

Thiba palace, Ratnagiri

Thiba palace, Ratnagiri

Thiba palace, Ratnagiri

Thiba palace, Ratnagiri

Lokmanya Tilak's birthplace, Ratnagiri

Lokmanya Tilak's birthplace, Ratnagiri

Lokmanya Tilak's birthplace, Ratnagiri

Lokmanya Tilak's birthplace, Ratnagiri

Lokmanya Tilak's birthplace, Ratnagiri

Lokmanya Tilak's birthplace, Ratnagiri

Lokmanya Tilak's birthplace, Ratnagiri

Aare beach, Ratnagiri

Ganpatipule beach

Ganpatipule beach

Somewhere along the ride

And another somewhere, something near Jaigad

Jindal school near Jaigad

Ferrying across the Jaigad creek

Ferrying across Dabhol creek

Aade beach

Aade beach

Narrow lanes and the omnipresent ST

Guhagar beach

Words of wisdom at Guhagar beach

Between Dapoli and Mahad

Romancing the roads .. beautiful stretch of road between Dapoli and Mahad. Most of this stretch is in poor state though!

And yet another ferry across yet another estuary

Happy feet, tired backs!

Monday, November 16, 2015

A chimney climb on the East face of Northern flank of Anjaneri massif

A beautiful virgin chimney climb that team Bhramanti did on the Diwali weekend, Nov 12 through Nov 14, 2015.

Please note: All photos included in this post are courtesy of Sankalp C.

Location / Base
From the forest department outpost near the base of Anjaneri massif where a flight of stairs lead up the fort, walk further South for 10 minutes. You can see two cracks on the wall overlooking the Anjaneri village. The first crack looks broken and chossy and of an easy gradient / easy scramble. Further to its South on the same cliff line the second crack / chimney is the one we attempted.

Second chimney from the right on the East face of Anjaneri's Northern flank


Approach
After a 10 minute walk from the forest department outpost, you will be standing straight below the said chimney. The approach to the base of the chimney is a mix of 3rd and 4th class scramble over some scree and loose rocks for approximately 150 feet – It is wise to rope up as a fall here could be bad. The last 25 feet of traverse towards the base of the chimney is exposed and I recommend to place a pro before making the move. I placed a BD #1 cam in this section. At the base of the chimney, there is a tree that would serve as a good anchor.

The chimney


The climb is a two pitch climb and both the pitches can be easily done with a 60m rope. A 50m may be good enough too, but may be a rope stretcher on the first pitch.

Pitch one
The first pitch is approximately 160 feet (with a 70m rope one can comfortably add up another 25 feet to find a good ledge). There are plenty of possibilities along the way to build a good anchor station. I nearly ran out the length of the 60m rope to find a good ledge. 

The first pitch is mostly a 5.5 climb with a couple of 5.7 moves thrown in the mix. The rock quality is better than the Sahyadri average, except for a few, which can be easily avoided. 

The start at the base of the chimney can was wet and hence I started the first 10-15 feet on the face to the right and then traversed left into the chimney. If you decide to do the face, please note that the face moves cannot be protected and it is a no fall zone or else you are sure to hit the ledge. The face moves go at around 5.8

The first 20 feet of face climb (unprotected) to avoid the wet patch near the base of the chimney

Once into the chimney, the climb is pretty straight forward over a couple of ledges for approximately 130 feet. I placed three protection for the first pitch. The first belay ledge takes anything from a BD #2 onwards up to #5. Large tricams may be handy here. I used a BD#5 and a BD #2 to build an anchor. My belayer appended it with a large tricam as the third point for additional safety as I lead the second pitch.

Myself leading on pitch one: Looking for a placement

Kaivalya wriggling through the chimney on pitch one

Pitch two
Pitch 2 is the money pitch of this climb. The second pitch starts as a wide chimney that narrows into an off-width above. The outer end of this chimney is too wide for straddling & bridging, unless you are a super-flexible gymnast! Also, owing to its super wide nature, it is difficult to protect near the base. So, I climbed the arete of the outer wall making up the chimney (some loose rocks attributable to constant wind erosion on the outer edge of this chimney) for about 20 feet. At around 20 feet I found a small horizontal crack that gobbled up a BD #.75 cam to my relief. Up till this point on the second pitch, the moves are unprotected, so a fall means certain decking. Once the chimney narrowed to my comfort levels, I moved into the chimney and bridged my way up for another 25 feet. Again, these moves are unprotected as the chimney is too wide to take anything.

Kaivalya following like a champ on pitch one

At around 25 feet above the previous protection, I managed to place a Big Bro #4 – it was a bomber placement and a confidence booster.

The chimney narrows and tapers rapidly above this point – too narrow to even wriggle through. A seconding climber with a backpack cannot surely fit in. I barely managed to wriggle through with a lot of scraping. I contemplated moving out on the face to bypass the narrow section, but the strong winds combined with loose rocks and scarce protection made me discard that thought. So I continued up in the chimney.

Near the end of this chimney, there is a chockstone that blocks the way. This chockstone is covered with scree on top and hence any attempt to grab the chockstone to look for good hold is wasted. However, this chockstone is firm and safe to protect with a 120 cm long sling. On the right side of the chockstone there is a decent crimp to pull oneself over the chockstone bulging out overhead. This move – exiting the chimney and pulling over the chockstone bulging overhead – I think is a 5.9 move and the crux of the route. The exposure is magnificent while doing this maneuver. Once over the top of the chockstone, a short 3rd class scramble of around 15 feet takes you to the summit. A solitary tree serves as a good anchor. There is one more tree a few feet higher on the left, however the cactus shrubs around it precludes its use as a good anchor. 

Descent
Walk off towards the North end of the Anjaneri massif and descend over a flight of stairs to the base in around 45 minutes.

Quick stats
  • Route: 250 feet chimney, 2 pitch climb on the East face of the Northern flank of Anjaneri massif
    • First pitch goes at 160 feet 5.7 
    • Second pitch a 100 feet at 5.8/5.9
  • Best time to climb: Being on an East face, the chimney is in almost always in the shade any time after noon.
  • Protection – 
    • Singles of BD #.75, #4 and #5; double up on BD #1, #2 and #3
    • Single pieces of  #4 and #5 Big bros 
    • 8 single length alpine quick draws; 4 double length alpine quick draws
    • 2 double length slings for slinging chockstones enroute
    • Anchor building gear – Long slings, locking carabiners, etc. etc. You know the drill!
  • 60m rope comfortably covers both the pitches
  • Rock quality: Above average in first pitch and very good in second pitch as long as you stay in the chimney.
  • Time required – 2 hours from the base of the chimney to the summit.
  • Style: The entire route is free and clean: no aid, no fixed pro and no bolts.

A climber's paraphernalia


The chimney climb we successfully completed.

Team Bhramanti
  • Kaivalya Varma
  • Pravin Dabholkar
  • Komal Gupta
  • Sajid C.
  • Santosh Nigade
  • Prashant Sawant
  • Dhiraj B.
  • Sankalp C.
  • Rohan Rao

Please note that all the description about the route, protection, gear placements and anchor conditions are my personal experiences during my lead on 12th November 2015. The route conditions are subject to change and hence always use your own discretion to judge your comfort levels while attempting the route – Rohan R. Rao.

Friday, September 4, 2015

Climbing in California - Aug 2015

It was an awesome trip. Good learning experience. Many firsts. Some mega classics. Some long alpine routes. A few fun multi-pitches. All in all just fantastic trip!

The photos posted below are taken by many people I climbed with over a period of few weeks in California - Sunny Jamshedji, Prajakta Korde, Oskar Waldemarsson, & Devin Waugh. Here they are ...

Cathedral peak & Eichorn pinnacle


Fairview dome


Palisades: Temple Crag & Mt. Sill